This User Guide provides tips on how to increase your effectiveness at building and maintaining your portfolio after mastering the directions in the QuickStart.
1. Develop locally
The QuickStart page shows you how to create and edit your portfolio “in the cloud” using only a browser. While this is a simple way to get started, there are some advantages to developing your portfolio locally:
- You can use your favorite text editor or IDE for writing (Emacs, Eclipse, IntelliJ Idea, etc.). Note: do not use Microsoft Word!
- After installing Jekyll, you can build and review the site instantly on your computer after making changes.
There are two components to developing your techfolio locally: (1) managing a local copy of your portfolio repo, and (2) running Jekyll locally to build your site.
1.1 Manage your files locally
To manage your portfolio repo on your computer, you will need to acquire basic familiarity with git and its implementation in GitHub.
While teaching you about git and GitHub is beyond the scope of this User Guide, here are some pointers to get you started:
- GitHub Hello World Guide. An introduction to managing GitHub repositories.
- GitHub Tutorial for Beginners. A 20 minute introduction to git and GitHub.
- GitHub Desktop. A desktop application to simplify basic git tasks for cloning repos and committing changes.
Although git can get really complicated really quickly, you only need to know enough to do the following:
- Clone your GitHub techfolio repo onto your local computer.
- Edit your techfolio files locally.
- Commit your local changes to GitHub.
Once you understand the basics of git and its implementation in GitHub, you no longer need to use a browser to edit your portfolio files. Instead, you can create or edit portfolio files on your computer using your favorite editor, then commit those files to GitHub. GitHub will then invoke Jekyll to rebuild your site and you can see the results in your browser.
1.2 Build your site locally
Once you are able to manage a local copy of your portfolio files on your computer, you can now install Jekyll so that you can build and review your site without committing to GitHub.
First, follow the Jekyll installation instructions. Note: TechFolios requires at least Version 3 of Jekyll.
Second, open a shell window, cd into your portfolio directory, and run the following command:
jekyll serve --baseurl ''
Third, open a browser and go to http://localhost:4000. You should see the home page of your site.
2. Getting updates
When you fork the TechFolio template repository while following the QuickStart, you create your own “snapshot” of that template code. However, the template code will occasionally be updated with new themes or other improvements. Major improvements to the template will be publicized in the News Page, so you can check there occasionally to see if there are updates to the template.
To incorporate an updated template into your own portfolio, you have to create a copy of your GitHub repo on your local computer, merge the updated template repo into your local copy of your portfolio, then push your updated local copy back to GitHub.
First, follow the instructions in Manage your portfolio files locally to obtain a local copy of your portfolio files on your computer.
Second, you need to ensure that the template repo is “upstream” of your repository. You can see this by executing the git remote -v command, which should show two remotes called “techfolios”. Open a command shell, cd to your portfolio directory, and execute the command. You should see something like this:
$ git remote -v
origin	https://github.com/philipmjohnson/philipmjohnson.github.io.git (fetch)
origin	https://github.com/philipmjohnson/philipmjohnson.github.io.git (push)
techfolios	https://github.com/techfolios/template.git (fetch)
techfolios	https://github.com/techfolios/template.git (push)
If you only see the “origin” remotes, then you need to add techfolios as a remote. To do this, execute the following:
$ git remote add techfolios https://github.com/techfolios/template.git
Now re-run the git remote -v command to verify that you have the techfolios remote set up.
Third, open a command shell, and cd into your portfolio directory. You will execute git fetch techfolios to obtain the techfolio template updates, git merge techfolios/master -m "Merge techfolio template into master." to integrate them into your local portfolio files, and git push origin master to push your newly updated portfolio files back to GitHub. Here’s a sample session illustrating what it should look like:
[~/philipmjohnson.github.io]-> git fetch techfolios
remote: Counting objects: 5, done.
remote: Compressing objects: 100% (5/5), done.
remote: Total 5 (delta 1), reused 0 (delta 0), pack-reused 0
Unpacking objects: 100% (5/5), done.
From https://github.com/techfolios/template
   176ab3c..e6617b5  gh-pages   -> techfolios/gh-pages
   f15fe5c..c3a508c  master     -> techfolios/master

[~/philipmjohnson.github.io]-> git merge techfolios/master -m "Merge techfolio template into master."
Merge made by the 'recursive' strategy.
 _includes/theme-essays-builtin-2.html | 2 --
 1 file changed, 2 deletions(-)

[~/philipmjohnson.github.io]-> git push origin master
Counting objects: 27, done.
Delta compression using up to 8 threads.
Compressing objects: 100% (27/27), done.
Writing objects: 100% (27/27), 2.57 KiB | 0 bytes/s, done.
Total 27 (delta 21), reused 0 (delta 0)
To https://github.com/philipmjohnson/philipmjohnson.github.io.git
   1656f1f..5a3bba7  master -> master
For more details on this process, consult Syncing a fork on GitHub. Note that the template repository will already be set as an upstream repository with the name “techfolios”.
Dealing with git merge errors
In some cases, the merge command will result in one or more “CONFLICT”s. In this case, you will need to resolve the conflicts, commit your changed files, and then push the results.
For example, let’s say there were updates to Molly Maluhia’s project or essay files. Since you deleted those files in your portfolio, when you try to merge you will get one or more messages like this:
CONFLICT (modify/delete): projects/project-3.md deleted in HEAD and modified in techfolios/master. Version techfolios/master of projects/project-3.md left in tree.
In this case, the right thing to do is to delete this file from the tree using this command:
$ git rm projects/project-3.md
Git will issue a warning that the file “needs merge”; you can ignore it.
Once you have removed all the files, you must commit your fixes using the following:
$ git commit -m "fixed merge conflicts"
Now you are ready to invoke the “git push origin master” command as documented above.
See the Help page if you need assistance.
3. Anatomy of bio.json
One of the trickier aspects of TechFolios is the bio.json file, because: (a) it has a fairly rigid syntax, and (b) if you create a syntax error while following the QuickStart, in some cases your only clue is that your site fails to display with your updates.
Fortunately, it is quite easy to diagnose and fix bio.json problems. First, let’s take a quick look at the format.
3.1 JSON format
If you haven’t worked with JSON formatted files before, all you really need to understand for TechFolios is that the bio.json file is a combination of objects and arrays. Objects are key-value pairs enclosed by curly braces, for example:
{
  "name" : "Philip Johnson",
  "address" : "1680 East-West Road"
}
This object has two keys (“name” and “address”), each with corresponding values (“Philip Johnson” and “1680 East-West Road”). There is always a colon between a key and its value.
Note: key-value pairs must be separated with a comma! This is one common syntax error in bio.json.
The second construct creates lists of values, or arrays:
[
  "blue",
  "red",
  "green"
]
The difference between objects and arrays is that arrays are defined using square brackets and consist of a list of elements separated by commas.
Note: each element in a list must be separated with a comma! This is another common syntax error in bio.json.
What makes JSON files complex is that you can combine objects and arrays. For example:
{
  "name" : "Philip Johnson",
  "address" : ["1680 East West Road", "Honolulu", "HI", "96822"]
}
Here we have an object where the value associated with the address key is an array.
A final comment: in JSON format, newlines and indentation are not significant. You could have the entire bio.json file on a single line and it would still be a legal file (although not very readable by humans). By convention, the bio.json file uses two space indentation.
3.2 Structure of bio.json
The bio.json file format is based on JSONResume. Here is the top-level structure:
{
  "basics" : { <basic profile information> },
  "work" : [ { work object }, { work object }, ... ],
  "volunteer" : [ { volunteer object }, { volunteer object }, ... ],
  "education" : [ { education object }, { education object }, ... ],
  "awards" : [ {  award object }, { award object }, ... ],
  "publications" : [ { publication object }, { publication object }, ... ],
  "skills" : [ { skill object }, { skill object }, ... ],
  "interests" : [ { interest object }, { interest object }, ... ],
}
It’s really pretty easy: apart from the first section (“basics”), all of the remaining sections are simply arrays of objects, where each object has a structure appropriate for the section.
Let’s look at examples of each section.
3.2.1 Basics section
First, here’s a sample value associated with the “basics” keyword:
{
  "name": "Philip Johnson",
  "label": "Professor",
  "picture": "https://philipmjohnson.github.io/images/philip.jpg",
  "email": "johnson@hawaii.edu",
  "phone": "808-956-3489",
  "website": "https://philipmjohnson.github.io",
  "summary": "I am a Professor of Information and Computer Sciences at the University of Hawaii.",
  "location": {
    "address": "1680 East-West Rd, POST 307",
    "postalCode": "96822",
    "city": "Honolulu",
    "countryCode": "USA",
    "region": "Hawaii"
  },
  "profiles": [
    {
      "network": "github",
      "username": "philipmjohnson",
      "url": "http://github.com/philipmjohnson"
    },
    {
      "network": "linkedin",
      "username": "philipmjohnson",
      "url": "http://linkedin.com/in/philipmjohnson"
    }
  ]
}
Note: In the “profiles” section, each of the social network objects must be separated by a comma (since they are in an array). If you add a new social network object, make sure that a comma separates it from the previous and next object.
3.2.2 Work section
Here’s an example of the value associated with the “work” keyword:
[
  {
    "company": "University of Hawaii",
    "position": "Professor",
    "website": "http://www.ics.hawaii.edu/",
    "startDate": "1990-08-01",
    "endDate": "Present",
    "summary": "Department of Information and Computer Sciences",
    "highlights": [
      "Professor, 2001-present",
      "Associate Chair, 2010-2016",
      "Director, Collaborative Software Development Laboratory, 1990-present",
      "Associate Professor, 1995-2001",
      "Assistant Professor, 1990-1995"
    ]
  },
  {
    "company": "Open Power Quality",
    "position": "CEO",
    "website": "https://openpowerquality.com/",
    "startDate": "2013-01-01",
    "endDate": "Present",
    "summary": "Co-founder and leader of technical development",
    "highlights": [  ]
  }
]
Unlike the “basics” keyword whose value is an object, the value associated with the “work” keyword is an array.
This array contains a list of objects, where each object has keys for company, position, website, etc.
Note: If you add or subtract work objects, be sure that each object is separated from each other by a comma.
3.2.3 Education section
All of the remaining sections are pretty much like the work section: an array of objects whose keys are appropriate for the information being presented. For example, here’s a sample value associated with the “education” keyword:
[
  {
    "institution": "University of Massachusetts, Amherst, MA",
    "area": "Computer Science",
    "studyType": "Ph.D.",
    "endDate": "1990-08-01",
    "gpa": "",
    "courses": [
    ]
  },
  {
    "institution": "University of Massachusetts, Amherst, MA",
    "area": "Computer Science",
    "studyType": "M.S.",
    "endDate": "1985-06-01",
    "gpa": "",
    "courses": [
    ]
  }
]
Again, when editing this section, make sure the individual education objects are separated by commas.
3.3 Debugging bio.json
OK, so let’s say you edited bio.json in your browser, committed the file, and after waiting 30 seconds or so, your profile site is not displaying with your changes. What’s wrong?
The most likely answer is that you have somehow forgotten to add a comma or made some other simple syntax error in your bio.json file. Now the question is: how to track down that error?
There are two simple steps to take: (1) validate your file against the JSON Resume schema, and (2) check that Jekyll can process the bio.json file.
3.3.1 Validate against the schema
First, you can try cutting and pasting your bio.json file contents into JSON Schema Validator. Here’s what the result of running it looks like:

Note that the validator can signal errors related to certain “date” fields. This is OK for TechFolios; our themes try to do the right thing when “Present” is provided as a date string.
However, if any other kinds of errors are signalled, then this indicates a potential bug in your bio.json file. Fix the errors and go on to the second stage of validation below.
3.3.2 Validate against Jekyll (YAML Lint)
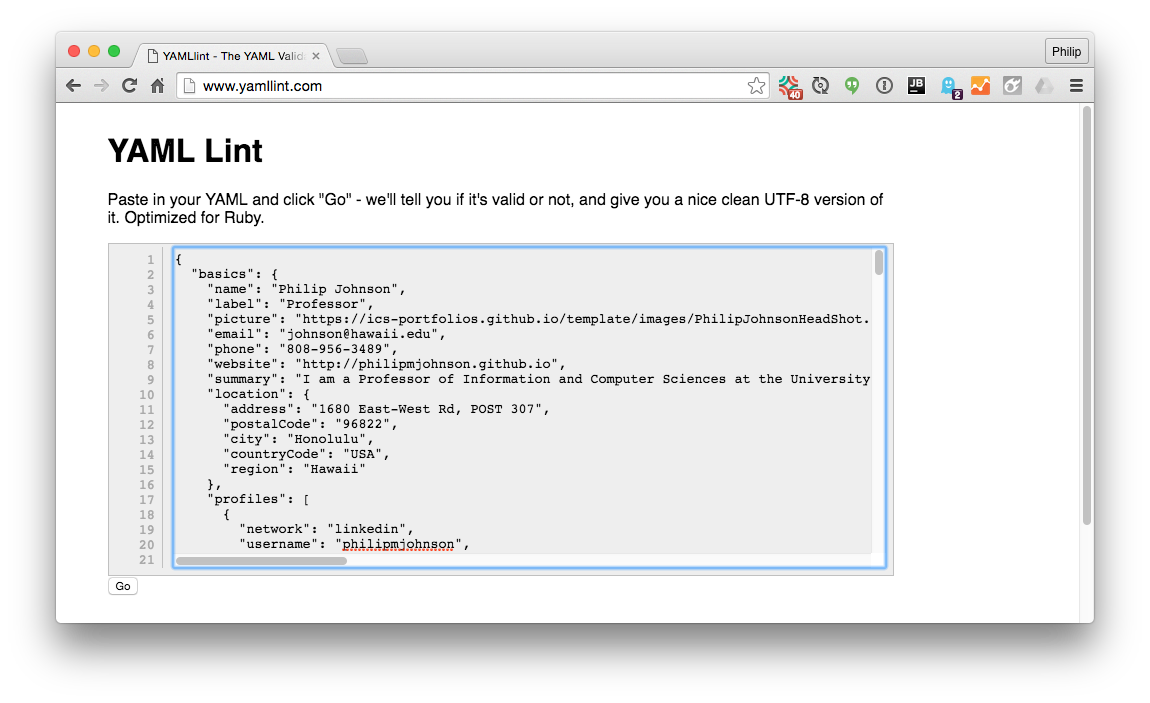
Once your bio.json file is found to be valid against the JSONResume schema, the next step is to see if Jekyll can process it correctly. To do so, you can use YAML Lint. Paste your bio.json file into the text field and see if errors occur. Here’s what the page looks like right after pasting in a bio.json file:
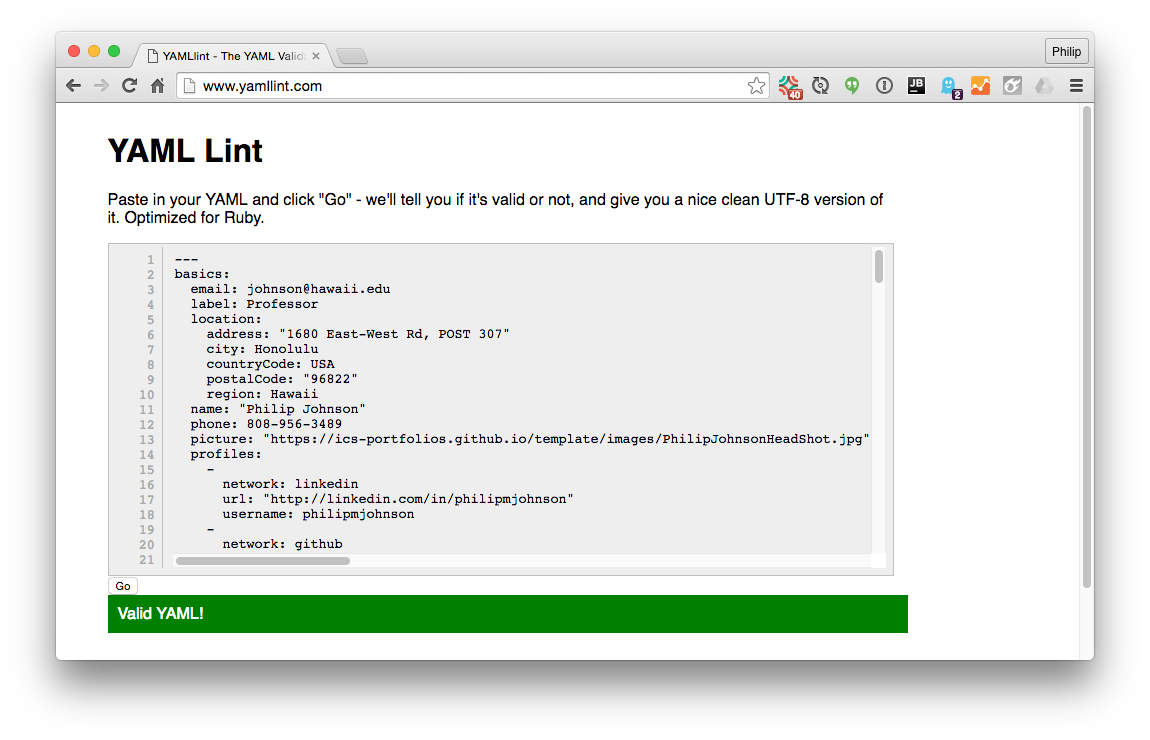
Here’s what happens after pressing “go”–the JSON is converted to YAML, and the page provides a green bar if no errors occurred:
Let’s say you forgot a comma when editing your social network entries. Here’s what YAML Lint might produce:
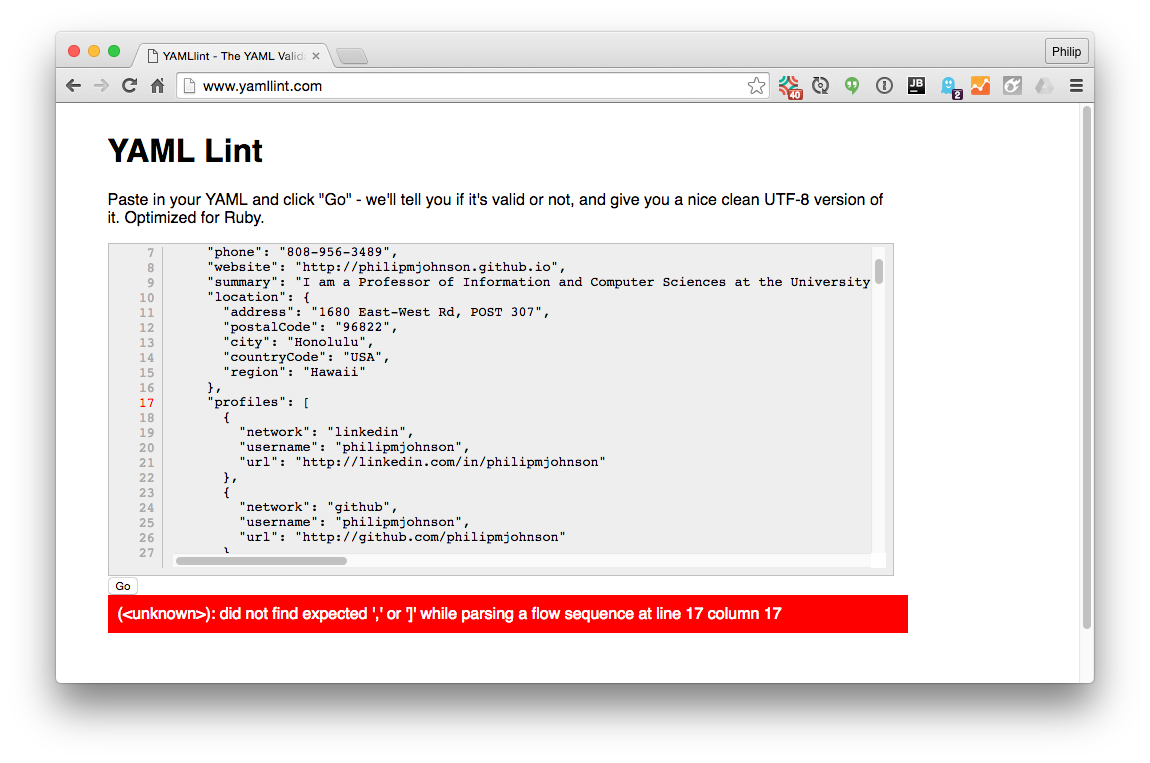
YAML Lint will indicate an error and the top-level section in which the error occurred (“profiles”). It won’t always tell you the exact line but hopefully the error message will give you enough information to track down the error.
3.4 Miscellaneous bio.json tips
Here are a few things we’ve discovered about bio.json while developing our portfolios:
-
You cannot comment out lines in your bio.json file. It is fine to have empty arrays, for example. But if there is actual data that you do not want displayed, then you have to delete it.
-
As noted above, the JSON Resume schema requires dates in the form YYYY-MM-DD, and the validator will flag the use of “Present” as an error. However, some of the TechFolio templates support the use of “Present” as an endDate field.
-
The JSON Resume schema does not require an “author” field. That’s totally lame. Fortunately, you can add fields to bio.json without violating the schema. So, TechFolios expects you to provide an “author” field in the publications object.
-
The bio-publications-2.html template checks for publication types “journal”, “conference”, “workshop”, “techreport”, and “thesis” in order to better support CV-style resumes. For an example of use, see the publications field in Philip Johnson’s bio.json.
-
The bio-publications-2.html template also checks for an award with type “grant” and creates a special section for those awards. For an example of use, see the awards field in Philip Johnson’s bio.json.
-
If you want to transmogrify your bio.json file into other formats, see Hack My Resume.
-
For heaven’s sake, don’t end up with a portfolio like this one.
Once your bio.json file passes both JSON Schema and YAML Lint, it should build without problem in TechFolio.
4. Missing pages
The template techfolio comes with default handling when users request an URL not associated with the site (i.e. 404 errors). The default response (see the top-level 404.md file and the missingpage.html template) is to indicate that the URL was not found and provide a list of links to all projects and essays. For example:
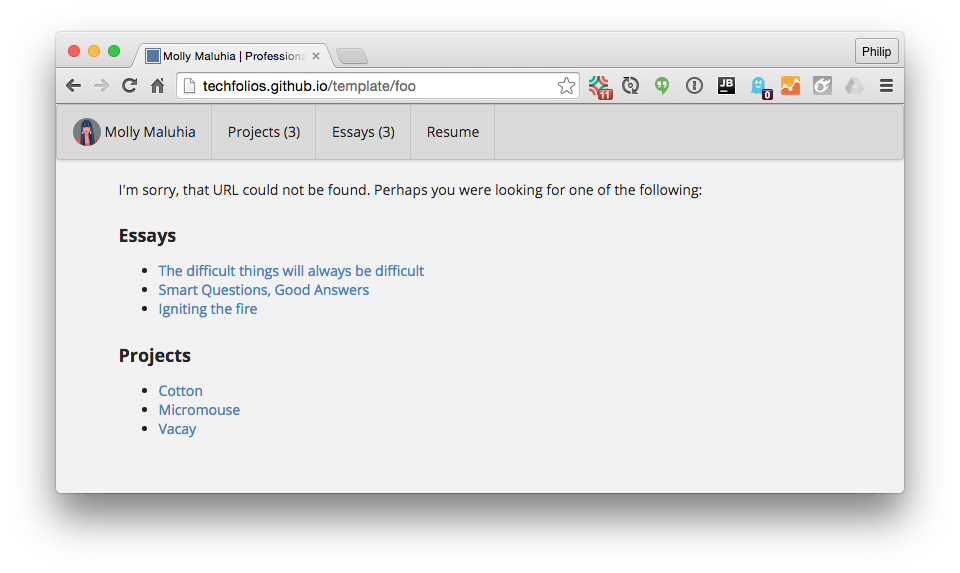
This is helpful if you are transitioning to TechFolio from another professional portfolio site and worry that others might have bookmarked URLs that will no longer point correctly to your updated essay and project pages.
If you prefer to handle 404 errors in a different way, the best way is to create a copy of the missingpage.html layout file (such as missingpage-pj.html) and then edit the front matter in 404.md to point to your new missingpage-pj layout. Then edit missingpage-pj.html to provide whatever information you wish to the user.
5. Drafts
Let’s say you are working on a project description or essay over a period of days, and it’s not yet ready for inclusion in your Essays or Projects page. You can exclude it from being listed by including “draft: true” the following in your YAML front matter. For example, here’s the front matter for an example draft essay:
---
layout: essay
type: essay
draft: true
title: Igniting the fire
date: 2015-08-26
labels:
  - Software Engineering
  - Learning
---
This essay will not appear in the list of essays on your Essays page, but it can be retrieved if you know the URL (in this case, it’s mostly likely essays/2015-08-26.html).
7. Formatting
Creating attractive project and essay pages requires basic understanding of GitHub Flavored Markdown (for text) and Semantic UI (for images). Fortunately, it’s not complicated.
7.1 Format text
To format text, use Markdown. For example, to create an H1 header, use #. To italicize a word, surround it with *. To create a link, start by enclosing the link label in [] and follow it with the URL in (). Here are some examples:
# Section 1
## Section 1.1

I think TechFolios is *awesome*.

Here is a link to [TechFolios](http://techfolios.github.io).
Note that you must put a space between the # header character(s) and the title text!
GitHub provides excellent documentation on the Markdown formatting available in basic writing and formatting syntax, including boldface, quotes, lists, code blocks, and so forth.
7.2 Format images
You can insert images using the plain old <img> HTML tag, but you can control the formatting of your images much better if you take advantage of the Semantic UI image classes. The example Molly Maluhia portfolio provides examples of the most common kinds of image formatting.
Float an image. The Vacay Project Page illustrates how to float an image to the right side of the text. Here is the code used to produce that image:
<img class="ui medium right floated rounded image" src="../images/vacay-home-page.png">
Note that this example not only floats the image to the right, but also sets the size to medium and rounds the corners.
Icon images. The Vacay Project Page also illustates the display of an icon, in this case, the GitHub icon in the link at the bottom of the page. Here is the code used to produce that:
<a href="https://github.com/theVacay/vacay"><i class="large github icon"></i>theVacay/vacay</a>
For a complete list of available icons, see the Semantic UI Icon Documentation.
Groups of images. The Micromouse Project Page illustrates a simple way to provide a group of images with similar formatting. In this case, all the images have the same size and rounded corners. Here’s the code that produced that format:
<div class="ui small rounded images">
  <img class="ui image" src="../images/micromouse-robot.png">
  <img class="ui image" src="../images/micromouse-robot-2.jpg">
  <img class="ui image" src="../images/micromouse.jpg">
  <img class="ui image" src="../images/micromouse-circuit.png">
</div>
Circular images. In some situations, circular images provide a nice design element for your page.
Important note: To create circular images, the source image must be square!! If your source image is not square, then the resulting “circular” image will actually be an oval.
I also recommend that if you want circular images, make sure the source image has a non-white background color. Otherwise, the circular nature of the image will be lost.
The Igniting the fire essay provides three examples of circular images. Here’s an abbreviated version of the essay’s markdown illustrating how the circular images were inserted and floated:
<img class="ui tiny left circular floated image" src="../images/paintbrushes.jpg">

Ever since I first grasped a paintbrush...

<img class="ui tiny left circular floated image" src="../images/design-technology.jpg">

I never used to think that design and technology...

<img class="ui tiny left circular floated image" src="../images/software-code.jpg">

I am now starting to take a Software Engineering class...
Location of image files. In the Molly Maluhia portfolio, a top-level images/ directory holds all the image files. Every project and essay can thus refer to an image through a relative link (i.e. src="../images/the-image.png"). This is not mandatory; you can put images whereever you want, but I find an images/ directory to be helpful for organization.
7.4 Format video
The Hackystat Project Page illustrates an embedded video. Here is how that YouTube video is embedded in that page:
<div class="ui embed" data-source="youtube" data-id="NrLFIpm0wps" >
</div>
To learn how to embed other kinds of media, see the Semantic UI embed documentation.
8. Custom theme design
If you want to create your own custom themes, you need to become familiar with two facilities: Jekyll templates and Semantic UI.
8.1 Jekyll Templates
TechFolio is based on Jekyll. Each of the pages are built using Jekyll Templates, which in turn are based on the Liquid Template Language.
We recommend that when defining a new theme, make a copy of an existing, working theme, and then start modifying it. Use the above links as reference when you want to do something where there is no existing sample code illustrating how to accomplish it.
8.2 Semantic UI
TechFolio uses Semantic UI as its CSS framework. See the Semantic UI documentation for details on this framework. Currently TechFolio uses Version 2.1.
8.3 Hack the bio.json format
It is possible to add fields to bio.json without violating the schema. In some cases, the easiest way to implement your vision for your portfolio is by first extending the bio.json format in a backward compatible manner, then creating a custom theme that looks for these additional fields.
An example of this approach is Philip Johnson’s CV page. This page provides separate sections for various forms of publications (i.e. journals, conferences, etc.) as well as a separate section listing awards that are grants. To implement this approach, Philip’s bio.json extends the default bio.json format with additional fields, and then the bio-publications-2.html template checks for those fields when laying out the page.
You can do the same thing. Just make sure you don’t make changes that break either the JSON Schema Validator or YAML Lint.
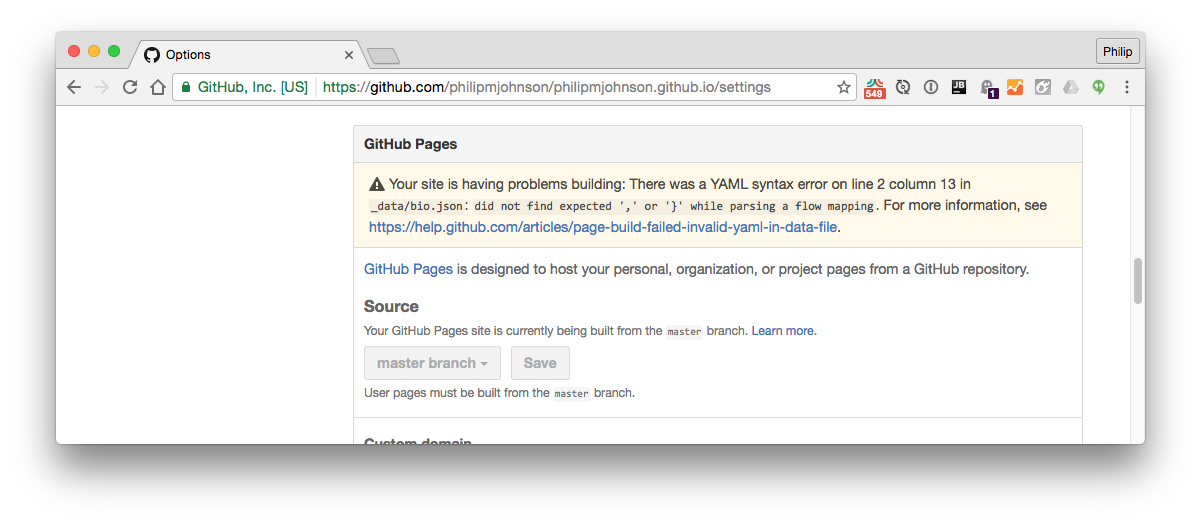
9. Debugging
If your site does not display at all, or does not publish your updates within a minute or so, then it is likely that you have introduced an error in your TechFolio setup. To find out, go to your TechFolio GitHub repository in your browser and click on the Settings link, then scroll down to the “GitHub Pages” section. If there was an error building your site, GitHub will sometimes indicate it there. Here is an example of an error due to a missing comma in my bio.json file:
Other times, GitHub does not indicate an error, and instead your project or essay simply fails to appear in your site. In this case, the best way to determine the error is to run your site locally. You can either install Jekyll and build your site locally, or else ask someone who has Jekyll running locally to build your site and let you know the error.
Based upon issues encountered by TechFolio users so far, here are some of the most common problems:
9.1 date field
In projects and essays, the date: field should be a valid date (in YYYY-MM-DD) format. For example:
date: 2016-01-02
9.2 permalinks
The “permalink” field can be used to provide a better URL for a project page. If you don’t supply a permalink, then the file name (with a .html rather than .md extension) will be used. Permalinks should be all lower case and provide the path to the projects section. For example, a valid permalink might look like this:
permalink: projects/hackystat
Don’t supply an actual URL as the permalink (i.e. “http://foo.bar/”).
9.3 Title contains a ‘:’ or a ‘,’
If your title field contains punctuation and is not in quotation marks, then Jekyll will fail to build the page. Here’s an example:
title: Kukui Cup: The Semantic UI Version
When running Jekyll locally, this page produces the following error:
[~/github/philipmjohnson/philipmjohnson.github.io]-> jekyll serve --baseurl ''
Configuration file: /Users/philipjohnson/github/philipmjohnson/philipmjohnson.github.io/_config.yml
            Source: /Users/philipjohnson/github/philipmjohnson/philipmjohnson.github.io
       Destination: /Users/philipjohnson/github/philipmjohnson/philipmjohnson.github.io/_site
 Incremental build: disabled. Enable with --incremental
      Generating...
Error reading file /Users/philipjohnson/github/philipmjohnson/philipmjohnson.github.io/projects/kukuicup.md: (<unknown>): mapping values are not allowed in this context at line 6 column 17
                    done in 0.783 seconds.
Unfortunately, GitHub does not report this type of error in the Settings page.
To fix this error, just put your title in quotes:
title: "Kukui Cup: The Semantic UI Version"
9.4 No space between field name and field value
You must have a space between the field name and its value. This is illegal:
title:Foo
This is correct:
title: Foo